Translate this page into:
Photography in dermatology: Basic concepts

*Corresponding author: Paola Pasquali, Dermatology Service Pius Hospital of Valls, Tarragona and Medicine and Medical Specialties Depatment Universidad de Alcalá, Madrid, Spain. dermapasquali@gmail.com
-
Received: ,
Accepted: ,
How to cite this article: Pasquali P, Kaliyadan F. Photography in Dermatology: Basic Concepts. CosmoDerma 2021;1:43.
Abstract
Photography of skin lesions has always been among the most popular non-invasive imaging techniques, one that assists in documenting and monitoring as well as teaching and research. Its importance has become more apparent in the past year with the COVID-19 pandemic and the sudden widespread use of teledermatology. Basic concepts of medical photography and using a proper camera are fundamental to obtain good quality images.
Keywords
Photography
Medical photography
Standardization
Camera
Equipment

INTRODUCTION
Iconographic representation of disease has been present from the beginning of humankind. They probably did not mean to be part of any educational material or to shape a body of categorized observations but rather reflected a simple observation of the body during disease processes. Paintings were painstaking, expensive, and time-consuming.[1] In addition, it was soon evident that no matter how talented the painter was, there was an element hard to overcome: subjectivity. This is the main reason why photography was so well accepted by the medical community: it was an objective representation of reality.[2]
It has taken almost 200 years of actively working with medical photography to realize that it is probably not as objective as we believed it was, when it first appeared. And still, we have entered an era where images are the new language: we substitute our feelings with emotions; we examine, diagnose and even operate patients through images, teaching and learning mostly relay on them.
But: what type of images do we need? How can we obtain such images? Is consent required? Where can medical images be stored safely? For a technique that has been around for so long, there are still too many unanswered questions. Despite this, medical photography is up to now the most versatile non-invasive imaging technique with which we are capable of generating images used for diagnosing, monitoring, and teaching. With the COVID-19 pandemia, teledermatology gave us the opportunity to reach our patients and democratize access to medical care. As it happened two centuries ago, photography is showing it is still a powerful technique, the standard of care in many visually oriented specialties, and as such, one that we need to be trained on.
ETHICAL ASPECTS
Before a photograph is taken, we must ask the patient if she agrees to be photographed. It is a basic rule of courtesy, the same one we should show to any person in any situation. In medicine, a proper explanation must follow detailing the reasons why the picture needs to be taken, where it is going to be stored, its eventual uses for teaching or publishing. Digital images are part of the health record and as such, they can be seen and retrieved by any person with access. Once the picture is taken, the person lose control over his image. It is, therefore, mandatory to explain the uses and get written consent and watch over all safety aspects. A patient’s image deserves the same respectful treatment as the person itself, even when the patient is deceased. These images should never be published on social media unless authorized by the patience. Doing so represents a breach of privacy and possible damage to the patient. Photographing sensitive areas can be extremely uncomfortable and needs to be of provable benefit. By restraining from taking a photograph, we are upholding the ethical principle of non-maleficence.[3]
Mobile photography needs special attention. Patient’s images should never be in personal cameras/phones. They must be downloaded into the electronic health records and erased from the camera. Finally, a patient’s image always belongs to her, not to the photographer. At any time, consent can be withdrawn.
EQUIPMENT
The first question naturally would be- “which camera do I get?” and while the answer has always been “Ideally a digital SLR,” smartphone cameras have improved by leaps and bounds in recent times giving a significant challenge to SLRs. Like for any format of photography, in the context of clinical photography high-end smartphone cameras, bridge, and mirror-less cameras can be used.
The discussion of camera resolution in terms of megapixels is moot now because virtually all new photography devices have at least 10 megapixels (studies have shown that for clinical photography anything above 8 megapixels is enough, as long as there is no major cropping involved).
SLRs have significantly larger sensor size, better quality of in-built flash, better flash synchronization, option of lenses and ability to shoot in RAW format and advance manual control. The main disadvantage would be the cost involved (especially when you are using multiple lenses), the bulk of the camera, and practical difficulties involved in changing lenses. While a lot of clinicians are comfortable using smartphones, it must be understood that smaller sensor size results in lower image quality which is further reduced by cropping. Less advanced manual controls, poor flash control, image distortion, and synchronization are other issues with smartphones. Although there are add-on lenses now available for smartphone cameras, their utility in clinical photography is minimal. Simpler cameras (point and shoot) have easy controls, are light and handy, but small sensor size, no flash and lens options, and making them a poor option. Bridge cameras (bulkier, larger sensor size, usually good optical zoom, and manual options); mirrorless cameras (as good as DSLRS in terms of image quality, but less bulky, just slightly less expensive, and large lens options) are valid options.
Light is what photography is all about. Indeed, photography literally is “writing with light.” Lighting is crucial to clinical photography too. While the inbuilt flash suffices in most cases, it can be a bit harsh for close-up images or a bit too weak when taken from a distance. The use of soft-boxes and reflector are ideal. If not, an external flash would be the simple alternative. When using the flash (especially the in-built flash), avoid going too close to prevent overexposure/whitening. Flash diffusers can be used to soften the inbuilt flash. For close-up photography, and areas such as the oral mucosa, ring-lights or dual/twin flash units can be used for best results. Dental retractors are useful for better focusing over mucosa lesions.
It is often said that your camera is only as good as your lens. However, some of these can be quite costly. A macro lens is quite useful in getting close-up views of skin lesions. For simpler cameras, an important parameter which you need to consider is optical zoom. A good optical zoom allows you to move back and zoom in, to get images without distortion, especially for cosmetic images of the face. Never use digital zoom.
Stabilizing the camera is fundamental to get sharp images. A tripod is an essential part of the dermatology photography armamentarium. There are smaller tripods (and flexible ones like the Gorillapod) available for all types of cameras, including smartphones. Remote shutter releases are another useful tool in some situations such as photographing children.
Get appropriate backdrops to eliminate distractions and reflections. Lighter colors (light blue or green) might be better for darker skin colors. For smaller areas, keep a smaller sheet of the same (including bibs). Have a large screen for viewing images for counseling your patients. A measuring tape is often needed to give a sense of size.
BASIC CONCEPTS
Cameras have a shutter which allows light to enter and in the case of digital cameras, this light then reaches an array of sensors, followed by a conversion into digital data in the form of a photograph. The lens in front of the shutter helps in focusing and zooming. Hence, the parameters we need to consider are the amount of light, the resolution/size of the sensors, focusing, and framing.
Light
Important factors to consider, as far as lighting is concerned include light source (ambient, in-built flash, external light sources); its duration (shutter speed [SS]/time it stays open); how much the shutter opens (the aperture) and the ISO (camera’s sensitivity to light) settings. Aperture, SS, and ISO together constitute the three corners of the exposure triangle [Figure 1]. When the camera is used in the auto mode, it self-adjusts all these parameters, and in most case of clinical photography, this is good enough. However, in certain situations, we do need to use manual settings to get the best results. The key points to remember are:
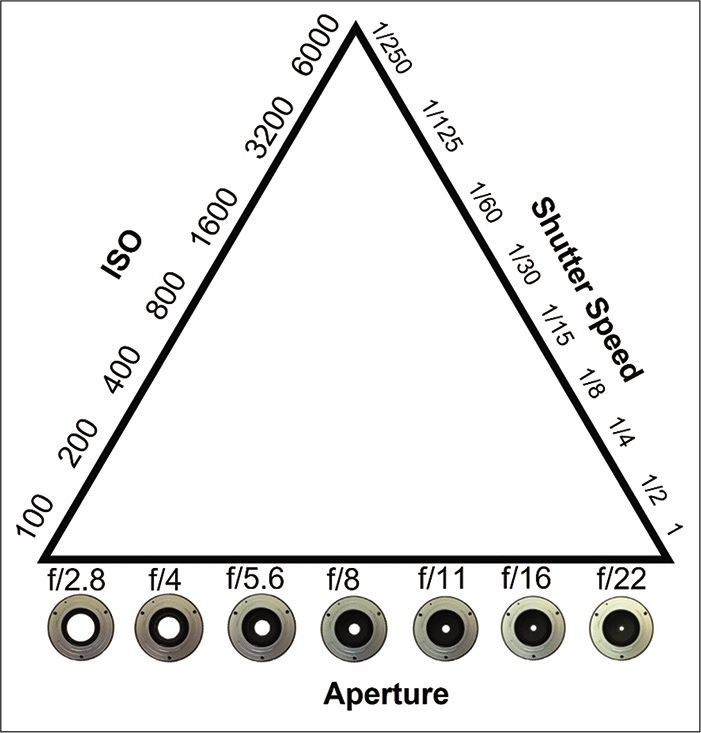
- The Exposure Triangle. ISO. Low ISO (100) values mean that the sensor will need to gather more light to make the exposure. Pictures will have less noise (grain). ISO, more grain, less light is needed to make the exposure (can take a picture with less ambiance light). Shutter speed. It refers to the length of time light is allowed to hit the sensor. Below 1/60, a tripod is required to avoid blurred images; faster speed, less light comes in/less blur. Aperture. It refers to the size of the central opening (hole) in the lens. The larger it is (f/2.8), the more lights will reach the sensor, the less the depth of field. In medical photography, we aim at low grain (low ISO)/high speeds (over 1/60) (lack of light can be compensated by using flash)/ small apertures (for large depth of field will allow for images entirely in focus).
Aperture
The smaller the aperture size (expressed as f/stops-with a high f-stop indicating a smaller aperture), the lesser the light enters. This gives a darker, but more uniformly sharper image (“everything in focus”) with less blur. As the aperture widens, more light enters. This leads to a brighter image but with more blurring of the background (shallow depth of field). The importance of depth of field (DOF) is that, if using a very shallow DOF, only some structures might appear focused (for example for a full-face image, you might get only the nose in focus).
SS
The longer the SS, the more light enters - so more brighter images, but with a higher chance of blur. When shutter speed is fast, it freezes movement - so darker, but less chance of blur.
One of the key points is that in any situation where the risk of blur is more (slow SSs/wide aperture), you would ideally need to stabilize the camera as much as possible and this is where the use of devices such as tripods are important. The classic adage is that using the flash freezes motion, but this again is a bit relative, and depends on the actual SS.
ISO
Higher the ISO, brighter the image, but with more noise/ grains. In general, for clinical images, if shooting manually, an ISO of around 100 is optimum.
The size of the sensors
As mentioned before, larger sensors give better images.[4]
Focusing
It can be manual or automatic. An important tip is to always take multiple images with different settings, review then and keep the good ones.
Framing [Figure 2]
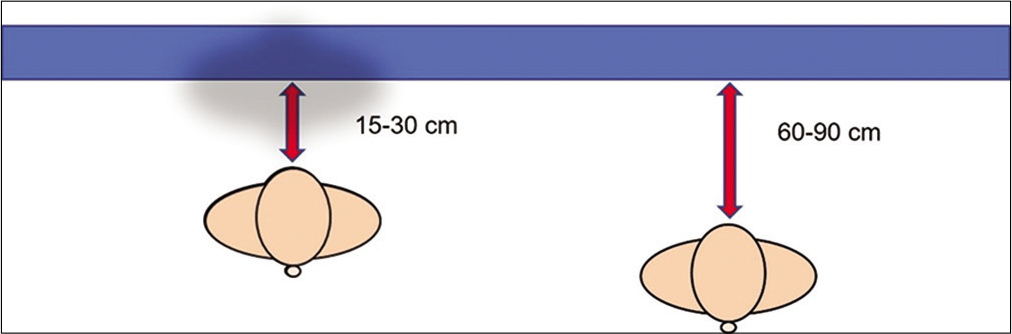
- Placing a backdrop behind the patient will remove distractions from appearing in the picture. Dark (black) backdrops reduce reflections and shadows and are best for light skin colors; blue/green backdrop is best for darker skin colors. The distance from the backdrop and the subject is also relevant: keeping the subject too close to the backdrop (15–30 cm) will allow shadows to be seen; by separating the patient from the backdrop, the shadows disappear.
The other important basic aspect of clinical photography is framing. Unlike artistic photography, in clinical photography, the frame needs to be filled to avoid waste space. For single lesions, a single close-up shot is enough, but it is best to include an anatomic landmark, if possible, to get a sense of location. For more extensive rashes, a zoomed-out image, showing the full extent of the rash, a medium shot, and a close-up shot for detailed morphology of the lesions is recommended. For close-up shots, do not go too close to the lesion to avoid distortion; zoom in the lesion if need a closer image. For dermoscopy images, take two images: one, all- inclusive with the scale; a second one, close-up of important details that need to be recorded. Distance from the backdrop is also relevant.
STANDARDIZATION
Standardization is mainly important in the context of pre-post images/follow-up images. The key to standardization is consistency and this involves all aspects - camera parameters, patient position, external lighting, and background.
Using a fixed colored, smooth, non-reflective, cloth screen, and placing it in a dedicated area in your clinic for photography, ensures a consistent background. Using the same camera setting in general for all images (aperture, SS, exposure, and locking the zoom), usually helps for face and hair images. Use standardized poses, depending on the area/treatment. For most images, the positioning should be cephalic (with the patient’s head towards the upper part of the frame).[5]
Marking out fixed points in the clinic/photography area with scotch tape can help in standardizing the position of the patient and the tripod/camera. However, the best option for standardization of pre-post images (mainly for face and hair), would be to use standardization frames. These frames offer pre-set angles for patient positioning and overlay options to ensure that the pre-post images are perfectly aligned. Some of these devices are directly linked to electronic medical records, so that storage, archival/retrieval is also easy. The main limitation of these devices is the cost. Simpler frames are easy to construct.[6] Overlay software is now available for smartphones which enables one to shoot images through a transparent overlay of the previous image (phantom-image), thus helping in better standardization (an example is: https://play.google.com/store/apps/details?id=com.codenex.before_and_after).
Commercially available color charts/gray cards can be placed as part of the image for standardization of color and white balance in conditions where the color of the lesion or affected area is key (such as melasma, vitiligo, or vascular lesions).
It is understandably difficult to standardize all the components for clinical images. And standardization can be a problem when different people are capturing follow-up images, but in general, if there is adequate planning and understanding among all the members of the team, good results can be obtained. Protocols should be kept as simple as possible so that it is easy for anyone on the team to take a standardized image according to the lesion, site, or planned treatment. Review of images, with constructive feedback, among the team also helps to smoothen out errors and maintain consistency. It is advisable to have a dedicated space for photography with position markers, cheat cards for standard camera settings, and samples of standard poses for ready reference.
Some amount of alignment for better comparison of pre-and post-images can be done using basic photo-editing software, but it is always better to keep pre-post standardization in mind while taking the follow-up image, instead of relying on post-processing. The best image is the one taken correctly right from the beginning. It saves time.
TOTAL BODY PHOTOGRAPHY (TBP)
Periodic skin cancer surveillance examinations have proven effective for the early detection of skin malignancies. Reducing unnecessary excisions is the goal when monitoring high-risk patients. The possibility to obtain baseline images to compare with a new set of images taken over time will allow to observe changes in individual lesions and the appearance of new ones. Most lesions will never change; instead, melanomas are dynamic lesions. It is important to bear in mind that 70% of melanomas occur de novo and only 30% of melanomas arise in association with a precursor nevus. Combining clinical TBP with dermoscopic images detects approximately 40% of melanomas in high-risk individuals.
In 3D TBP, 2-dimensional patient’s images are stitched together to create a 3D avatar which eliminates image overlapping when only 2D photographs are used. For both 2D and 3D images, the equipment’s software will orient with the analyses. TBP reduces both the patient and physician anxiety of missing to diagnose malignancies at early stages; minimizes unnecessary biopsies and helps identifying early changes and new lesions. The future will be the development of total body dermoscopy, which will reduce time and increase precision.
STORING
Most of us would have experienced loss of images at some point or the other. The good thing now is that digital storage has become much more compact, convenient, and cheap. While there are no hard and fast rules on storage. It would be good to store on at least back-ups on a physical drive and one on a cloud. Furthermore, use at least back-up SD card/micro SD card for your main camera in case you run out of space or the card crashes.
The important thing is to back-up regularly (every day) and in a manner which is easy to retrieve. For retrieval, the key is to tag the images appropriately. Both Windows and Mac offer inbuilt keyword tagging options and these are searchable. A basic minimum for tagging would be the patient’s name, diagnosis, and identification number. However, extra notes can be inserted into the tags (other details which can help are tags related to location of the lesion and procedure done/ duration of follow-up after procedure, if relevant).
It is a good practice to use a master folder for each patient, in which all relevant data can be added – including clinical images dermoscopy images, histopathology, and radiology. Patient summaries as a screenshot can also be added (within the limits of local regulations regarding patient records). Follow-up images can be added as date marked sub-folders within the same master folder. The master folder should also be labeled with the patient name, identification number, and diagnosis.
Finally, it is of utmost importance to ensure that your storage is adequately password protected. Strong security is essential for both physical and cloud storage, to avoid data leakage.
CYBERSECURITY
The immense advantages of technology give us in generating, storing, and transmitting medical information come to the hand of the serious risk of it being intercepted, compromised, or withheld. Measures need to be taken to secure all valuable information in our computer systems against unauthorized attacks. For a system to be considered secure, it needs to address the concept know as the CIA Triad: confidentiality-integrity-availability. For example, to preserve a patient’s confidentiality, his/her images should only be shared, stored, and shared via systems that were securely designed to do so.[7]
Most cyber breaches are due to human error. In medical photography, one important concept is that cameras should never be on personal devices, least of all phones which have Internet access. Imaging devices should be traceable.
Storage should be in safe devices of limited and known access. Avoid connecting to public Wi-Fi for medical activities, use updated security software and have a secure system. It is your responsibility to protect your patient’s data.
CONCLUSION
Medical photography is a powerful imaging system that has become available to most physicians. Learning is relatively simple, and the information is extremely valuable to both patients and physicians. Good images will help us diagnose at a distance (teledermatology), monitor patients, get second opinions, and are an indispensable teaching tool. They are part of the patient digital information and as such we need to be strict with ethical and legal considerations as well as preserving privacy issues. Training programs for the new generations of dermatologists must include medical photography.
Declaration of patient consent
Patient’s consent not required as there are no patients in this study.
Financial support and sponsorship
Nil.
Conflicts of interest
Conflict of Interest Dr. Paola Pasquali is the editor of “Photography in Clinical Medicine”, a book on medical photography. (Pasquali, P. (2020). Photography in Clinical Medicine (1st ed. 2020 ed.) Springer.
References
- The dermatology photographic ancestors In: Pasquali P, ed. Photography in Clinical Medicine (1st ed). Berlin: Springer; 2020. p. :15-31.
- [CrossRef] [Google Scholar]
- History of medical photography In: Pasquali P, ed. Photography Clinical Medicine (1st ed). Berlin: Springer; 2020. p. :47-72.
- [CrossRef] [Google Scholar]
- Ethical aspects of the use of photography in clinical medicine photography in clinical medicine In: Pasquali P, ed. Photography in Clinical Medicine (1st ed). Berlin: Springer; 2020. p. :75-84.
- [CrossRef] [Google Scholar]
- Available from: http://www.photoseek.com/2013/compare-digital-camera-sensor-sizes-full-frame-35mm-aps-c-micro-four-thirds-1-inch-type [Last accessed on 2021 Aug 20]
- Proposed technical guidelines for the acquisition of clinical images of skin-related conditions. JAMA Dermatol. 2017;153:453-7.
- [CrossRef] [PubMed] [Google Scholar]
- A simple instrument designed to provide consistent digital facial images in dermatology. Indian J Dermatol. 2013;58:194-6.
- [CrossRef] [PubMed] [Google Scholar]
- Cyber security: Medical photography and social media In: Pasquali P, ed. Photography Clinical Medicine (1st ed). 2020. p. :47-72.
- [CrossRef] [Google Scholar]