Translate this page into:
Suturing techniques

*Corresponding author: Ravi Kumar Chittoria, Department of Plastic Surgery, Jawaharlal Institute of Postgraduate Medical Education and Research, Puducherry, India. drchittoria@yahoo.com
-
Received: ,
Accepted: ,
How to cite this article: Chittoria RK, Reddy BP. Suturing techniques. CosmoDerma. 2024;4:133. doi: 10.25259/CSDM_153_2024
Abstract
The act of suturing wounds on the skin has been done for thousands of years. Closing dead space, supporting and strengthening wounds until healing increases their tensile strength, approximating skin edges for an esthetically pleasing and functional result, and minimizing the risks of bleeding and infection remain the primary goals of suture techniques, even though suture materials and techniques have changed. A well-planned closure or flap may have its post-operative appearance jeopardized if the wrong suture technique is used or if the procedure is not performed well. On the other hand, poor surgical skills cannot entirely be made up for by careful suturing. Poor incision placement with respect to relaxed skin tension lines, excessive removal of tissue, or inadequate undermining may limit the surgeon’s options in wound closure and suture placement. Gentle handling of the tissue is also important to optimize wound healing. The choice of suture technique depends on the type and anatomic location of the wound, thickness of the skin, degree of tension, and desired cosmetic result. Proper placement of sutures enhances the precise approximation of the wound edges, which helps minimize and redistribute skin tension. Wound eversion is essential to maximize the likelihood of good epidermal approximation. Eversion is desirable to minimize the risk of scar depression secondary to tissue contraction during healing. Usually, inversion is not desirable, and it probably does not decrease the risk of hypertrophic scarring in an individual with a propensity for hypertrophic scars. To maximize the esthetic and functional outcomes, dead space must be removed, natural anatomic shapes must be restored, and stitch marks must be minimized. This page describes the methods for placing sutures for different kinds of stitches, goes over why certain suture techniques are better than others and goes over the benefits and drawbacks of each suture technique. For the best possible closure of a wound, multiple suture techniques are frequently required. After reading this article, the reader ought to comprehend the basic techniques for inserting each type of suture as well as how and why specific sutures are selected.
Keywords
Suturing techniques
Sutures
Needle
INTRODUCTION
Reducing dead space and supporting the wound to help the healing process fortify it are the two main objectives of appropriate suturing techniques.[1]
Roughing up the skin’s edges to maintain both function and appearance
Reducing the chance of bleeding and infections.
In addition to taking into account the factors that influence wound healing, an assessment of the wounds’ anatomic position, thickness of skin, degree of tension, and intended cosmetic outcome should always come before any wound treatment.[2,3]
IMPORTANT POINTS FOR SUTURING
-
The gathering is a maneuver that should be used for every suture to get the excess line out of the way and off the table:[4,5]
Push the needle through the skin with a needle holder
Then with the thumb and the index finger grasp the needle and pull the suture through
Now using the fifth digit pull the suture into your hand as you re-grab the suture with your thumb and index finger
Repeat the above steps, subsequently.
-
Wound eversion:[6]
Essential for good epidermal approximation and reduces the risk of scar depression secondary to tissue contraction during healing
The needle should always penetrate the skin at a 90° angle to minimize the size of the entry wound and promote eversion.
Wound layers should be placed in close approximation.[7]
Minimize the amount of tension across the suture line.[8]
Equal bites, horizontally and vertically result in a flask-shaped configuration, i.e., the stitch is wider at its base (dermal side) than its superficial portion (epidermal side).
Small bites can be used to precisely coapt wound edges. Large bites can be used to reduce wound tension.[9]
Debride devitalized tissue.[10]
STEP-BY-STEP SUTURING TECHNIQUE
-
Apply the needle to the needle holder one-half to three-quarters of the distance from the tip of the needle[11,12] [Figure 1]
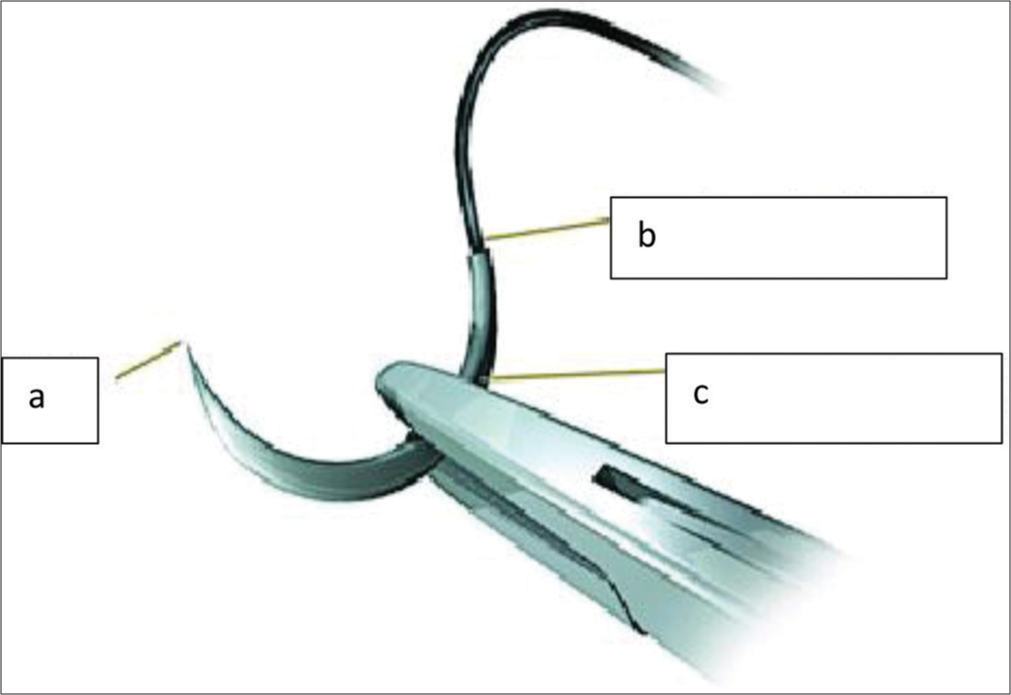 Figure 1:
- (a) Needle point, (b) Swage, (c) Body of needle.
Stabilize the wound edge and apply gentle traction with either toothed forceps or a skin hook[13].
Insert the needle 1–3 mm from the wound edge at a 90° angle to the skin surface.
After passing through the dermis and epidermis, the needle should descend and remove a tiny piece of subcutaneous tissue.
To push the needle through the tissues, rotate your wrist.
To ensure you have enough suture material to reach the other side of the incision, remove the needle from the needle holder, reach into the wound, grasp the needle tip with the needle holder, and pull it free.
To prevent uneven wound-edge heights, insert the needle on the opposite wound edge at a depth equal to the initial placement (i.e., stepping). The needle should exit the skin in the opposite direction, perpendicular to the skin, and equidistant to the opposite side.
Pull the needle through the skin until you have approximately 1-inch suture strand protruding from the bite sites.
Release the needle from the needle holder and wrap the suture around the needle holder twice.
Grasp the end of the suture material with the needle driver (instrument tie) and pull the two lines across the wound site in opposite directions. This is called a throw. It can be done using one’s hands too.
Do not position the knot directly over the wound edge.
Two throws make a “knot.” Repeat three or four throws to ensure knot security. Over each throw, reverse the order of the wrap (squaring). Proper squaring of successive ties prevents the creation of a granny knot which tends to slip and is inherently weaker than a properly squared knot.
Cut the ends of the suture one-quarter inch from the knot [Figure 2].
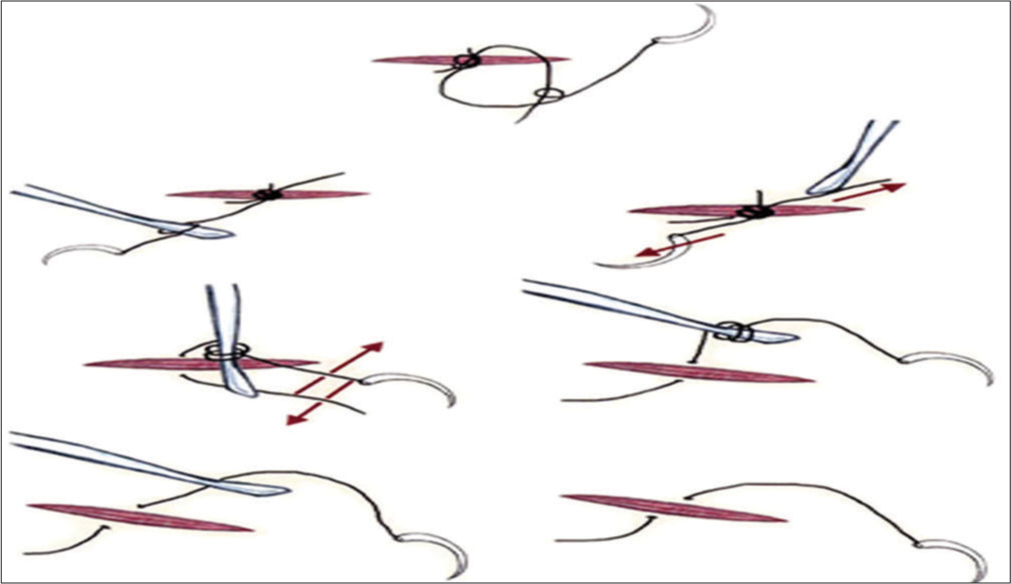
- Placing the knot.
Ideal skin approximation
Ideal skin approximation is where there is no gap between the edges either at the dermal or subcutaneous level [Figure 3].
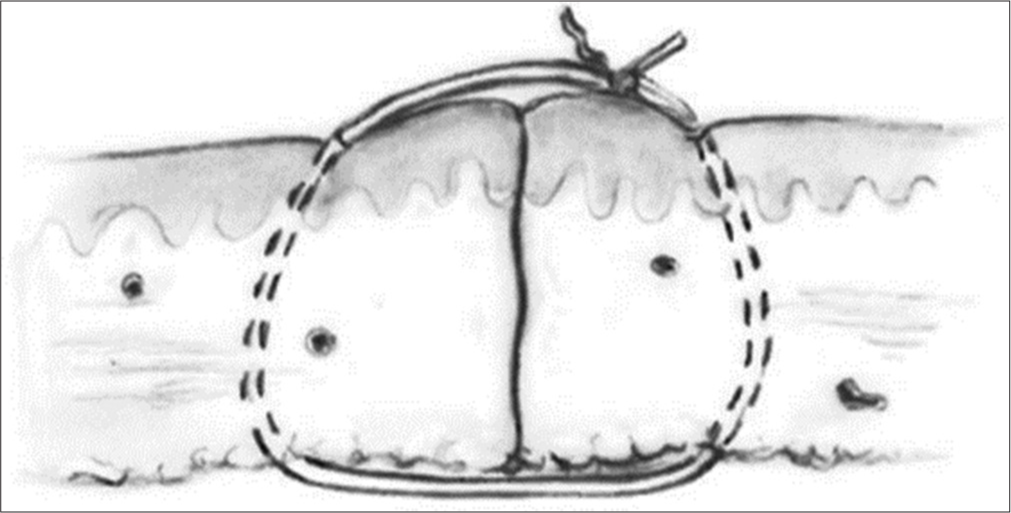
- Ideal skin approximation.
TYPES OF SUTURING TECHNIQUE
Simple interrupted sutures
-
Interrupted sutures are individually placed and tied. The technique involved is mentioned above and needs to be repeated; however, many times is required depending on wound length. Sutures should be placed 0.5 cm apart. Less potential for causing wound edema [Figure 4]
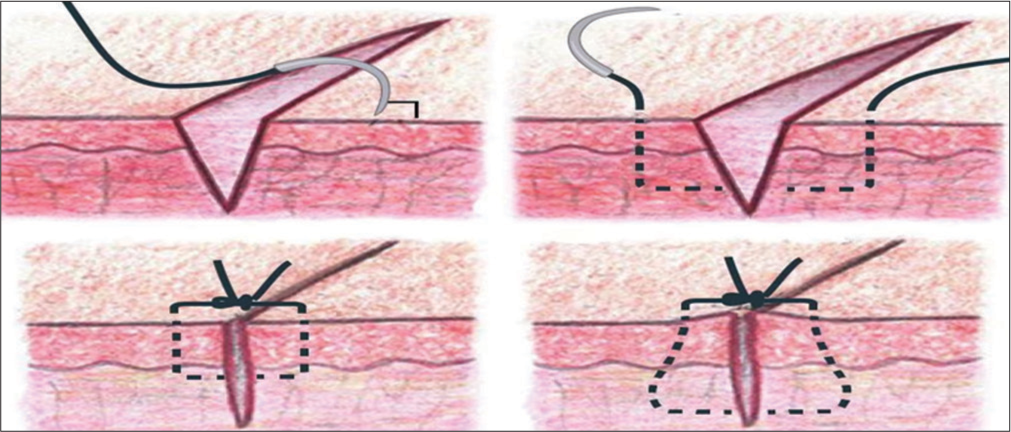 Figure 4:
- Simple interrupted sutures.
Disadvantage: More time is required to place interrupted sutures and more risk of crosshatching (train tracks) across the suture line. The latter can be minimized by early suture removal.[1,14]
Running sutures
Simple running sutures
-
A continuous sequence of basic interrupted sutures. The beginning of suture begins with a basic interrupted stitch that is tied without cutting the line that leads to the needle. Place the needle back at the same distance away from the injury. After the needle is entered, push it out the opposite side while keeping it perpendicular to the wound. Re-insert the needle so that the suture crosses over the top of the wound rather than tying it. Repeatedly pass through the wound perpendicularly now. Continue until the wound is closed, then tie off [Figure 5].
 Figure 5:
- Simple running sutures.
Benefits: Faster insertion and reduced scarring
Drawbacks: In patients with thin cutaneous tissue, puckering of the suture line may occur; if the suture material fails, it may induce crosshatching and wound dehiscence.[1,15]
Running locked sutures
Also known as baseball sutures due to their final appearance. The first knot of a running suture is tied as mentioned earlier and is then locked by passing the needle through the loop preceding it as each stitch is placed. Useful in wounds that need more hemostasis (oozing from skin edges), e.g., scalp and post-auricular sulcus. Can impair microcirculation and cause strangulation. Should only be used in areas that are adequately vascularized[1,16] [Figure 6].
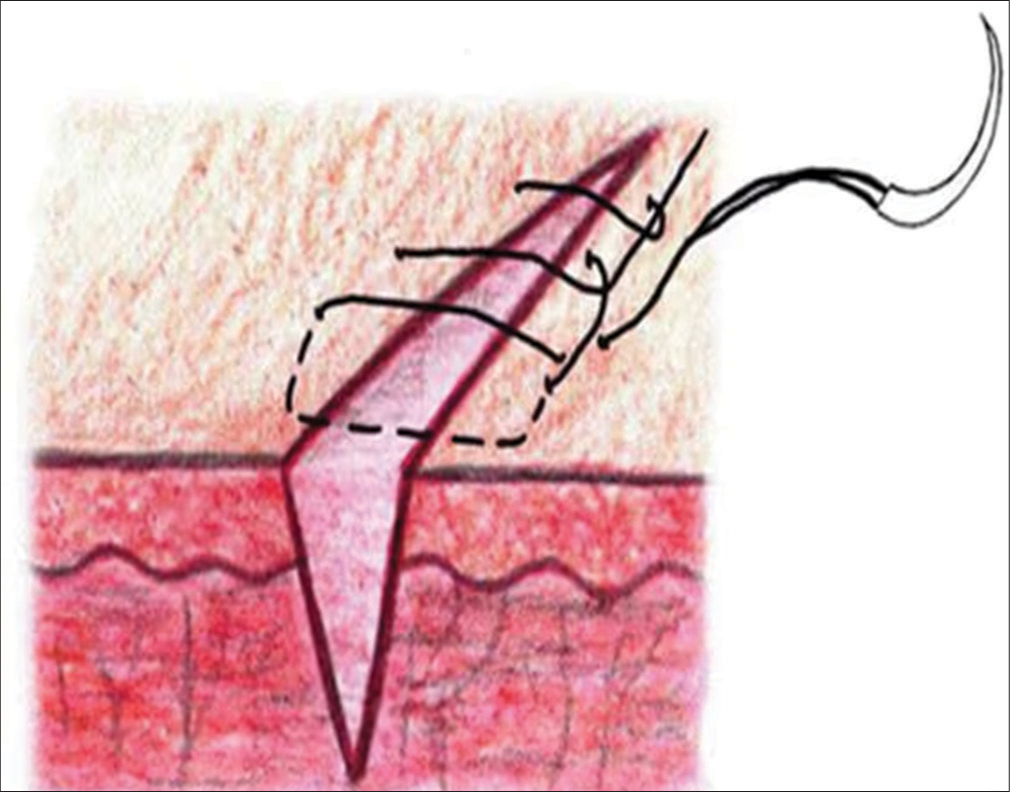
- Running locked sutures.
Running subcutaneous corset plication stitch
The corset plication technique is used in wounds wider than 4 cm that are under excess tension. It creates natural eversion and better wound edge approximation. This technique eases subsequent placement of intradermal sutures, in that wound diameter and tension are significantly reduced. Potential problems include suture breakage and wound distortion.[1,17]
Mattress sutures
Vertical mattress sutures
-
Changing up basic interrupted sutures. Restricts small blood vessels and penetrates both deeply and superficially. Go in and out of the wound, narrowly and shallowly, to place this suture. Next, re-insert the needle farther away from the wound on the same side as the exit. Return the needle to the opposite side of the wound, deeper than it was on the initial pass. Tighten the suture, then knot the ends as previously. The amount of tension on the wound should be exactly proportionate to the stitch’s width [Figure 7].
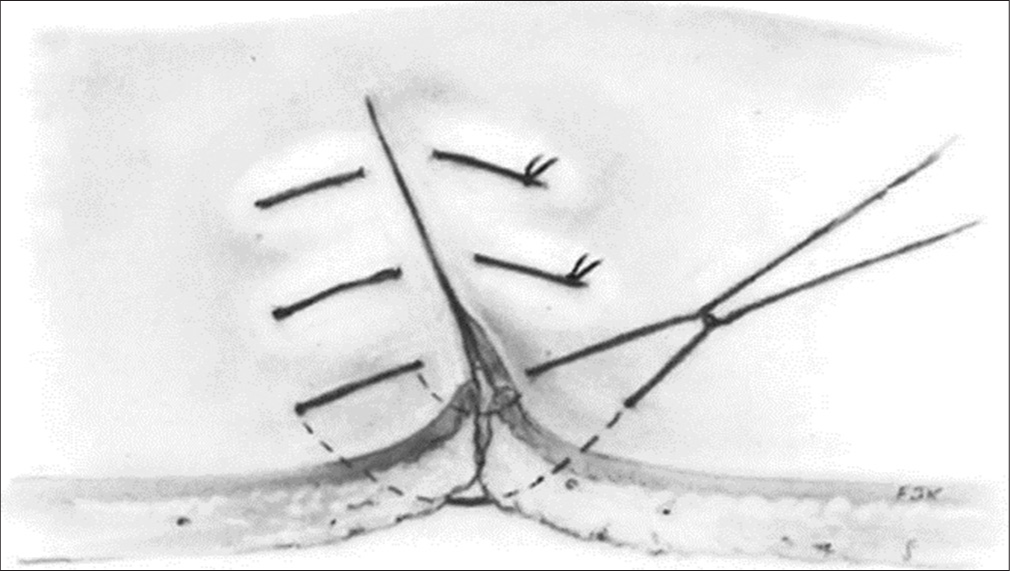 Figure 7:
- Vertical mattress sutures.
Beneficial for optimizing wound eversion, decreasing dead space, and lowering tension throughout the wound.
Disadvantage: Cross-hatching
Early suture removal (5–7 days) should be done to reduce scarring.[1]
Pulley suture technique: “far-near-near-far.” The needle is placed “far” from the wound edge. The needle is placed “near” starting deep to the galea on the opposite wound edge. The needle is placed “near” on the opposite wound edge. The needle is placed “far” starting deep to the galea on the opposite wound edge [Figure 8].
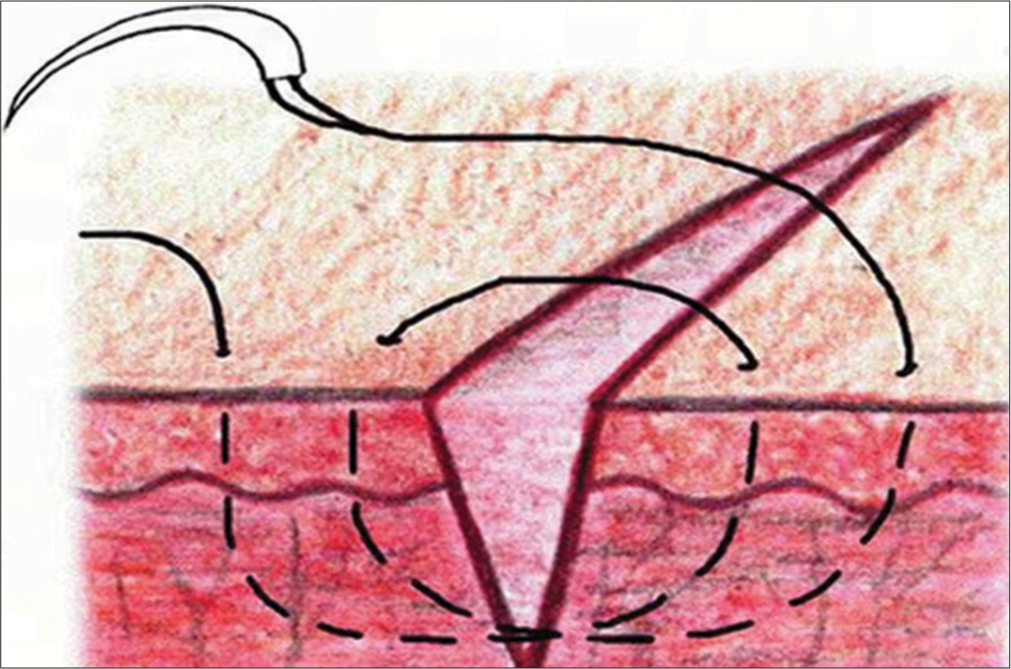
- Pulley suture.
Horizontal mattress sutures
-
Starts as a deep, basic interrupted stitch that penetrates the skin between 5 and 1 cm from the edge of the wound, travels through the dermis, and emerges at a location that is equally spaced on the other side. On the same side of the suture line, the needle is now re-inserted 5 mm–1 cm lateral to the exit point that emerges from the opposite side. To finish the knot, tie the ends together [Figure 9].
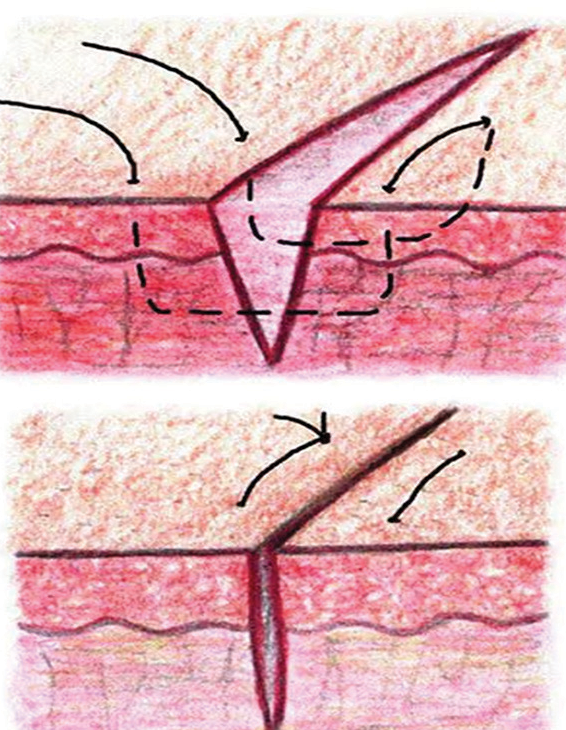 Figure 9:
- Horizontal mattress sutures.
Beneficial for high-tension wounds and suitable as a stay stitch in situations when there is a significant danger of dehiscence. Enhanced eversion and strength of the wound.
Drawback: A significant chance of tissue strangulation.[1]
Buried sutures
Buried sutures are a useful technique for wide gaping wounds and wounds where eversion is difficult. The purpose of this stitch is to line up the dermis and thus enhance healing. The knot needs to be as deep into tissues as possible (buried) so that it does not present through the epidermis and cause irritation and pain.
Modified half-buried horizontal mattress suture
The modified corner stitch allows equal eversion of the flap tip edges and improved esthetic outcomes. Although it may increase the risk of necrosis if tied too tightly, a study by Faulkner et al. suggested that the incidence of flap tip necrosis was comparable with that of the traditional corner stitch. Modified subcutaneous buried horizontal mattress sutures relieve more wound tension and have a lower risk of dehiscence compared with vertical buried mattress sutures[18] [Figure 10].
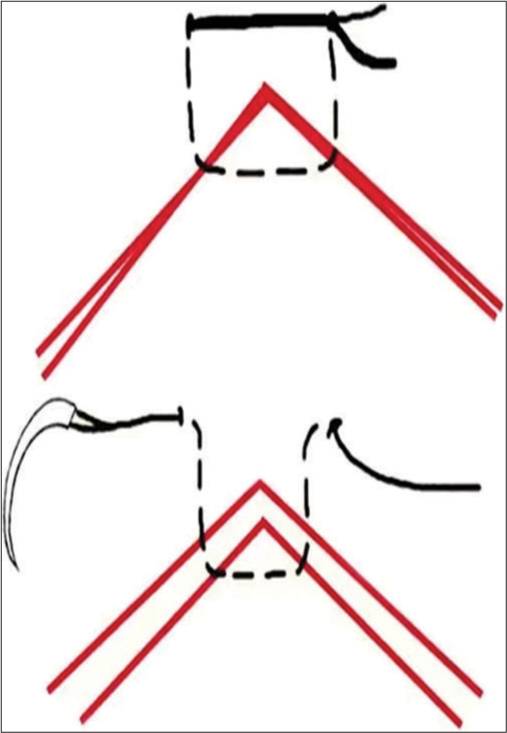
- Modified half-buried horizontal mattress suture.
Deep tip stitch
The deep tip stitch is used for M-plasty, W-plasty flaps, and V-Y closures to increase wound eversion. It provides longer-term support to the flap than the traditional corner stitch does and improves the alignment of the tip with the sides of the closure. This technique also avoids surface sutures, decreasing the risk of track marks. Flap tip necrosis and complications were comparable to that of standard sutures[8] [Figure 11].
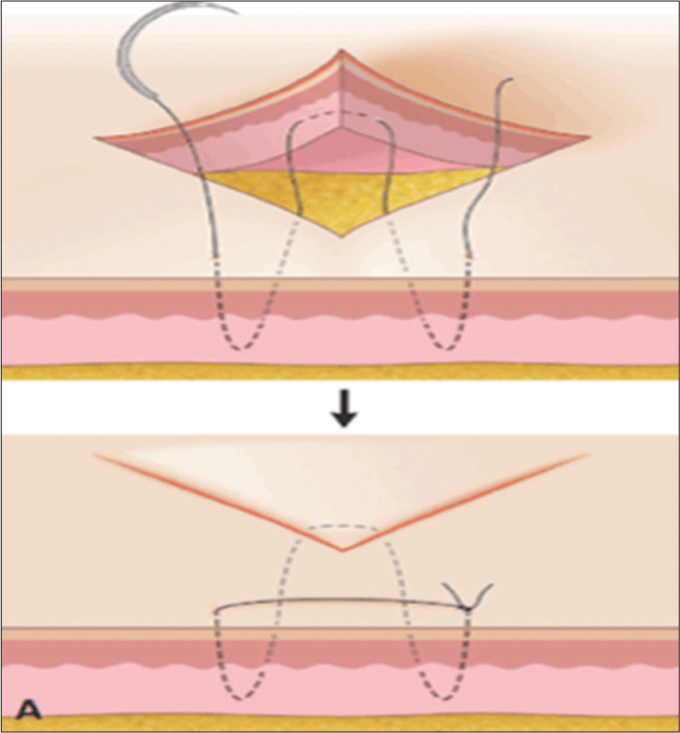
- Deep tip stitch. Black arrow denotes after suturing.
Variations of running sutures
Running horizontal mattress sutures
After placing a simple suture, the horizontal mattress is placed. The final loop is tied to the free end of the suture material [Figure 12], useful at places where wound inversion chances are high, e.g., neck and also useful for reducing the spread of facial scars.[1,16]
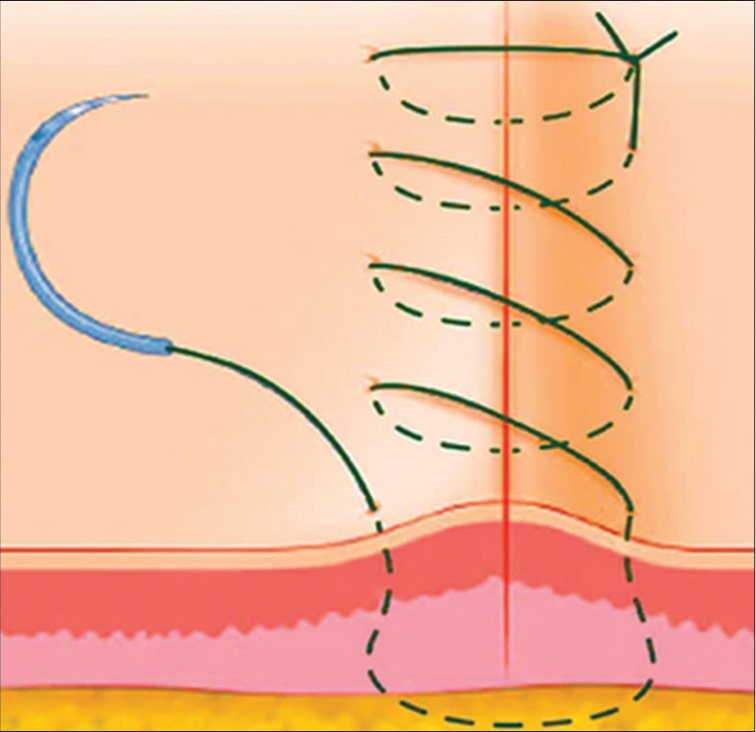
- Running horizontal mattress sutures.
Running subcuticular sutures
Useful in situations with minimal wound tension and dead space, and when the best cosmetic result is desired
-
Can result in minimal visible suture marks, little crosshatching, as well as closely approximated wound edges [Figure 13]
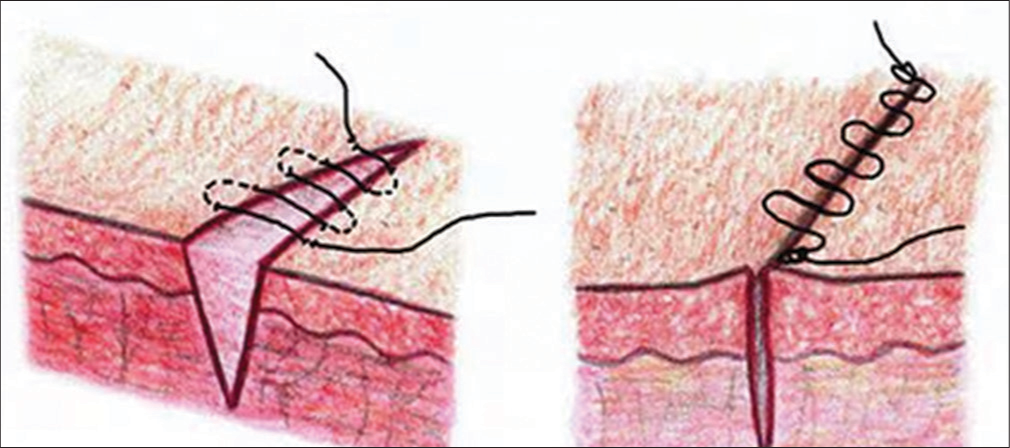 Figure 13:
- Running subcuticular sutures.
Running subcutaneous sutures
Begins as a running subcutaneous suture. The knot is tied but not cut. The suture is looped through the subcutaneous tissue by successively passing through the opposite sides of the wound.
-
Next, the knot is tied at the opposite end of the wound by knotting the long end of the suture material to the loop of the last pass that was placed [Figure 14].
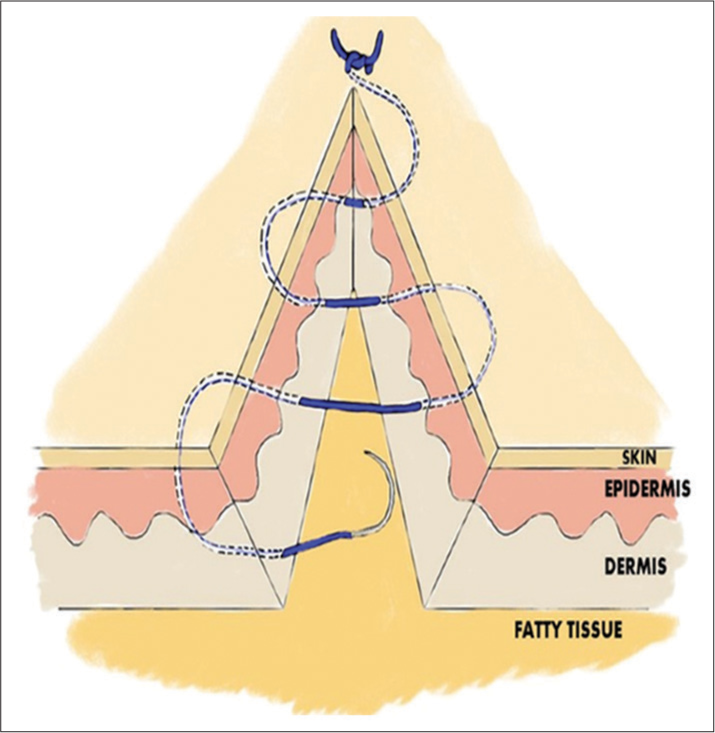 Figure 14:
- Running subcutaneous sutures.
It is used to close a deep portion of surgical defects under moderate tension.
Disadvantages: Suture breakage can create dead space underneath the cutaneous surface.[1,18]
TECHNICAL CONSIDERATIONS
Best practices
Effective suturing technique depends on the appropriate selection of
Sutures,
Surgical gloves,
Needles, and
Needle holders
Suture selection
A large portion of the suture selection procedure is based on the preferences and training of the surgeon. For every surgical site and need, a large range of suture materials are available.[19] Usually, the surgeon chooses the smallest stitch that securely captures the borders of the healing wound. The suture’s tensile strength must never be more than the tissue’s tensile strength. The relative decrease of suture strength should occur more slowly as the wound heals than the increase in tissue tensile strength.[20]
The choice of sutures can be guided by several general concepts. When a wound reaches its maximum strength, sutures are no longer necessary. Thus, absorbable sutures may be used to close mucosal wounds (tissues that heal quickly), but non-absorbable sutures should be taken into consideration for skin, fascia, and tendons (tissues that heal slowly).[21]
Understanding surgical suture materials
1. Absorbable versus non-absorbable:
The first crucial distinction lies between absorbable and nonabsorbable sutures. Absorbable sutures are designed to break down naturally in the body over time, eliminating the need for removal. Non-absorbable sutures, on the other hand, require manual extraction.
2. Natural versus synthetic:
Sutures are crafted from both natural and synthetic materials. Natural options include catgut and silk, while synthetic choices comprise materials such as nylon, polyester, and polypropylene. Each material comes with its unique properties, influencing factors such as strength, elasticity, and tissue reaction.
3. Monofilament versus multifilament:
Sutures can be categorized as monofilament (single strand) or multifilament (multiple strands twisted together). Monofilament sutures, such as nylon, reduce the risk of infection due to their smooth surface, while multifilament sutures, like silk, offer enhanced flexibility.
Factors to consider in suture selection
1. Tissue type
Different tissues demand different suture materials. Delicate tissues, such as the liver or blood vessels, may benefit from finer and more flexible sutures, while stronger and more substantial sutures may be suitable for dense tissues like tendons.
2. Duration of support:
Consider how long the suture material needs to provide support. Absorbable sutures are suitable for tissues that require temporary support, while non-absorbable sutures are ideal for structures that need extended or permanent reinforcement.
3. Infection risk:
The risk of infection is a critical consideration. Monofilament sutures, with their smooth surface, minimize the chance of bacterial harborage, reducing the risk of postoperative infections. Multifilament sutures, while offering flexibility, may pose a slightly higher infection risk.
4. Allergies and sensitivities:
Patient-specific factors, such as allergies or sensitivities, should be taken into account. Some individuals may react to certain suture materials, emphasizing the importance of selecting a material that minimizes the risk of adverse reactions.
Tailoring suture selection to surgical procedures
1. General surgery:
Common general surgery procedures often benefit from versatile synthetic sutures such as polydioxanone or polyglactin.
2. Cardiovascular surgery:
Cardiovascular procedures may require non-absorbable, high-tensile strength sutures such as polypropylene or polyester.
3. Orthopedic surgery:
Orthopedic surgeries, involving dense and load-bearing tissues, may necessitate robust non-absorbable materials such as stainless steel wire or polyethylene sutures.
4. Dermatological procedures:
Dermatological interventions often utilize finer, more cosmetic-friendly sutures like monofilament nylon or polypropylene.
Choosing the right surgical suture material is a critical decision that impacts patient outcomes and recovery. Surgeons must consider the nature of the tissue, the duration of suture support required, the risk of infection, and patient-specific factors when making this crucial selection. By understanding the nuances of different suture materials and tailoring choices to specific surgical procedures, health-care professionals can optimize wound healing and contribute to the overall success of surgical interventions.
Surgical glove selection
Surgeons who use sutures and needles should wear sterile surgical gloves without cornstarch, which has been shown to promote wound infection, cause serious peritoneal adhesions and granulomatous peritonitis, and act as a well-documented vector of the latex allergy epidemic.[22,23]
Needle selection
For needles, there is no accepted terminology or sizing scheme. The goal of choosing needles with the least amount of trauma should be kept in mind. For easily penetrated tissues, a taper-point needle is enough.[24] Usually, cutting needles are used on difficult tissues.
Round-bodied needles are used in friable tissue such as liver and kidney.
Cutting needles are triangular in shape and have three cutting edges to penetrate tough tissue such as the skin and sternum and have a cutting surface on the concave edge.
Reverse cutting needles have a cutting surface on the convex edge and are ideal for tough tissue such as tendon or subcuticular sutures and have reduced risk of cutting through tissue. All closures, with the exception of skin sutures, can generally be performed with taper-point needles. The surgeon’s ability to put a suture is influenced by the needle’s length, diameter, and curve. The needle-body diameter and suture size should ideally match.[25-28]
Needle-holder selection
No standardized sizing system or nomenclature is available for needle holders.[29] Needle control and performance are affected by the stability of the needle within the needle holder; thus, for a secure needle hold and prevention of rocking, turning, and twisting, the jaws of the needle holder must be appropriate to the needle size. Often, the surface contact with the needle-holder jaws and the bending moment of the needle is maximized with an ovoid cross-section of the needle body.[19,30,31]
In addition, the handle of the needle holder must be appropriate for the depth needed for the suture placement.[32] A mechanical advantage for exerting force through the needle point is created by the difference between the length of the handle and the jaw.[33]
The needle-holder clamping moment is a measure of the force applied to a suture needle by the needle holder, and the needle-yield moment is the amount of deformation that can occur before a needle is permanently deformed. Thus, when the needle-holder clamping moment is greater than the needle-yield moment, the needle is likely to be permanently deformed, which may lead to complications.[34]
CONCLUSION
Proper placement of sutures enhances the precise approximation of the wound edges, which helps minimize and redistribute skin tension. Wound eversion is essential to maximize the likelihood of good epidermal approximation. The elimination of dead space, the restoration of natural anatomic contours, and the minimization of suture marks are also important to optimize the cosmetic and functional results. Henceforth, a proper suturing technique is required for a good cosmetic result.
Ethical approval
Institutional Review Board approval is not required.
Declaration of patient consent
Patient’s consent is not required as there are no patients in this study.
Conflicts of interest
There are no conflicts of interest.
Use of artificial intelligence (AI)-assisted technology for manuscript preparation
The authors confirm that there was no use of artificial intelligence (AI)-assisted technology for assisting in the writing or editing of the manuscript and no images were manipulated using AI.
Financial support and sponsorship
Nil.
References
- Suturing techniques In: Dermatologic surgery. United States: Blackwell Publishing Ltd; 2012.
- [Google Scholar]
- A novel surgical technique: Placement of the suture lateral to the punch biopsy defect. Dermatol Surg. 2007;33:222-4.
- [CrossRef] [PubMed] [Google Scholar]
- Barbed sutures: A review of the literature. Plast Reconstr Surg. 2008;121:102e-8.
- [CrossRef] [PubMed] [Google Scholar]
- Techniques for cutaneous sutured closures: Variants and indications. Semin Cutan Med Surg. 2003;22:306-16.
- [CrossRef] [PubMed] [Google Scholar]
- Effect of simple interrupted suture spacing on aesthetic and functional outcomes of skin closures. J Cutan Med Surg. 2019;23:580-5.
- [CrossRef] [PubMed] [Google Scholar]
- Tie-over bolster dressings vs basting sutures for the closure of full-thickness skin grafts: A review of the literature. J Cutan Med Surg. 2018;22:602-6.
- [CrossRef] [PubMed] [Google Scholar]
- Comparison of running cutaneous suture spacing during linear wound closures and the effect on wound cosmesis of the face and neck: A randomized clinical trial. JAMA Dermatol. 2019;155:321-6.
- [CrossRef] [PubMed] [Google Scholar]
- Underappreciated utility of the purse-string suture in head and neck skin cancer defect reconstruction. Dermatol Surg. 2019;45:216-22.
- [CrossRef] [PubMed] [Google Scholar]
- Absorbable versus nonabsorbable sutures for skin closure after carpal tunnel decompression surgery. Cochrane Database Syst Rev. 2018;2:CD011757.
- [CrossRef] [PubMed] [Google Scholar]
- Horizontal running mattress suture modified with intermittent simple loops. J Cutan Aesthet Surg. 2013;6:54-6.
- [CrossRef] [PubMed] [Google Scholar]
- The victory stitch: A novel running v-shaped horizontal mattress suturing technique. Dermatol Surg. 2011;37:1663-5.
- [CrossRef] [PubMed] [Google Scholar]
- A running modification of the percutaneous buried vertical mattress. Dermatol Surg. 2012;38:1560-2.
- [CrossRef] [PubMed] [Google Scholar]
- Zipper stitch: A novel aesthetic subcutaneous closure. Dermatol Surg. 2013;39:1400-2.
- [CrossRef] [PubMed] [Google Scholar]
- Modified subcutaneous buried horizontal mattress suture compared with vertical buried mattress suture. Ann Plast Surg. 2017;79:197-202.
- [CrossRef] [PubMed] [Google Scholar]
- Use of 5-0 fast absorbing gut versus 6-0 fast absorbing gut during cutaneous wound closure on the head and neck: A randomized evaluator-blinded split-wound comparative effectiveness trial. J Am Acad Dermatol. 2019;81:213-8.
- [CrossRef] [PubMed] [Google Scholar]
- Relationship of cellular enzyme activity to catgut and collagen suture absorption. Surg Gynecol Obstet. 1969;129:691-6.
- [Google Scholar]
- Comparison of poliglecaprone-25 and polyglactin-910 in cutaneous surgery. Dermatol Surg. 2013;39:1340-4.
- [CrossRef] [PubMed] [Google Scholar]
- Biomechanical performance of a braided absorbable suture. J Long Term Eff Med Implants. 1996;6:169-79.
- [Google Scholar]
- Evaluation of a novel technique for wound closure using a barbed suture. Plast Reconstr Surg. 2006;117:1769-80.
- [CrossRef] [PubMed] [Google Scholar]
- Syneture stainless STEEL suture. A collective review of its performance in surgical wound closure. J Long Term Eff Med Implants. 2006;16:101-10.
- [CrossRef] [PubMed] [Google Scholar]
- Novafil. A dynamic suture for wound closure. Ann Surg. 1986;204:193-9.
- [CrossRef] [PubMed] [Google Scholar]
- An innovative absorbable coating for the polybutester suture. J Long Term Eff Med Implants. 2001;11:41-54.
- [CrossRef] [PubMed] [Google Scholar]
- Equal cosmetic outcomes with 5-0 poliglecaprone-25 versus 6-0 polypropylene for superficial closures. Dermatol Surg. 2010;36:1126-9.
- [CrossRef] [PubMed] [Google Scholar]
- The cyanoacrylate topical skin adhesives. Am J Emerg Med. 2008;26:490-6.
- [CrossRef] [PubMed] [Google Scholar]
- Sutureless skin closure with isoamyl 2-cyanoacrylate in pediatric day-care surgery. Pediatr Surg Int. 2009;25:1123-5.
- [CrossRef] [PubMed] [Google Scholar]
- Randomized prospective study comparing conventional subcuticular skin closure with Dermabond skin glue after saphenous vein harvesting. Ann Thorac Surg. 2009;88:1445-9.
- [CrossRef] [PubMed] [Google Scholar]
- Sutureless closure of the upper eyelids in blepharoplasty: Use of octyl-2-cyanoacrylate. Aesthet Surg J. 2009;29:87-92.
- [CrossRef] [PubMed] [Google Scholar]
- Dermabond bolster-assisted primary closure of atrophic skin. Plast Reconstr Surg. 2009;123:147e-9.
- [CrossRef] [PubMed] [Google Scholar]
- A randomized controlled trial of high-viscosity 2-octyl cyanoacrylate tissue adhesive versus sutures in repairing facial wounds following Mohs micrographic surgery. Dermatol Surg. 2007;33:966-71.
- [CrossRef] [PubMed] [Google Scholar]
- Incidence of hypertrophic and keloid scars after N-butyl 2-cyanoacrylate tissue adhesive had been used to close parotidectomy wounds: A prospective study of 100 consecutive patients. Br J Oral Maxillofac Surg. 2009;47:290-3.
- [CrossRef] [PubMed] [Google Scholar]
- Microporous biodegradable polyurethane membranes for tissue engineering. J Mater Sci Mater Med. 2009;20:1729-41.
- [CrossRef] [PubMed] [Google Scholar]
- Long-term efficacy of anchored barbed sutures in the face and neck. Dermatol Surg. 2008;34:1041-7.
- [CrossRef] [PubMed] [Google Scholar]
- Dysesthesia and fasciculation: Unusual complications following face-lift with cog threads. Dermatol Surg. 2007;33:253-5. discussion 255
- [CrossRef] [PubMed] [Google Scholar]
- A case of aptos thread migration and partial expulsion. Dermatol Surg. 2005;31:356-8.
- [CrossRef] [PubMed] [Google Scholar]


